
Craft Supplies to keep, or to find, around the house
You can make so many crafts just with things around the house:
-toilet paper tubes (Christmas tree angels, nativity characters, animals, buildings, castles...)
-paper towel/napkins -leaves
-packing peanuts -popsicle sticks (yup, eat a popsicle, use the stick!)
-bubble wrap -old crayons or candles
-styrofoam wrap (off any electronic items when new, or from fragile items when they are boxed)
-food colouring -scraps of sidewalk or other chalk
Halloween Costumes
I've not taken pictures of all of these, as I haven't actually made each of them this year. If you make them please send pictures ([email protected]) so I can post them. Children do not need to be wearing costumes when picture is taken.
DORA: Short black wig, or black hair, pink t-shirt, jeans, and a back pack
Ballerina/Dancer: Body suit and tights or leggings, put hair in a bun
Black Cat: Black shirt and pants, purchase headband with ears from Dollar Store, they may also have a set with the tail... Colour nose pink with facepaint and add white whiskers
Rock Star: Old jeans with rips or holes, old t-shirt
Robot: Find a box, stand it on end, take off the top flap, cut a hole in the top (may also cut it out in a large U so it can slide on), cut out a hole in each side for the arms and remove the bottom. Allow child to decorate the box however they want, or draw on basic shapes and allow them to colour it. Dress them in black or grey pants and matching t-shirt or sweater (weather appropriate). This is also suitable for a snowsuit and hat if needed.
Cat Tail: Using an old pair of nylons simply fill the foot and part of the leg with stuffing (old clothes, craft stuffing, filler, etc) then tie it closed. Wrap the remaining part of the leg and the other leg around your waist and tie above the "tail" The remaining part may be cut off or hidden based upon your preference.
Christmas Crafts
It's that time of year again! So lets start making some great crafts with our kids!
Christmas Tree
This is a simple little tree, with a whole in the top and string it can hang, or it stands on its own.
Fold a piece of green construction paper in half, then in half again. Draw, then cut out, the shape of a tree, using the corner where the two folds meet as the top, and so the second fold runs down the middle. (do not unfold the paper for this, just like how we used to make hearts for valentines) Use felt or crayon to decorate the tree. This picture isn't very good, will try for a better one tomorrow Christmas WreathI came up with this idea once in a preschool room. We needed to make a craft for the parents, and it had to be simple and use easy to find supplies. I don't have a picture of one, but I'll try to make one soon and post it. It does use a glue gun, so ensure that your child does not tough the glue gun, but it is your decision to let them help with the rest and decide where the decorations go.
You need: Metal Coat Hanger Garland (Christmas leaves, and tinsel if you want) Glue Gun Small decorations (small Christmas balls, plastic poinsetta flowers, etc) Bent the coat hanger so the bottom is round (or close to it) Wrap the leaf garland around the coat hanger, tie it at the top if you chose, wrap the tinsel garland around as well. Try and cover the metal from the hanger with the garlands. Use the glue gun to glue the decorations on wherever you (or your child) wants them |
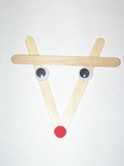 I located this Christmas Reindeer from popsicles at ChristmasCrafts.com. There are so many ideas there, but I felt this was too cute not to share.
You need: 3 popsicle sticks Eyes Pompom Glue 1. Glue two popsicle sticks together to form a "V" then glue the third about one inch below the top, across the other two. 2. Glue on the eyes and the glue the pompom at the bottom of the "V" for the nose. You can tie it with a ribbon to create a tree ornament. You can visit ChristmasCrafts.com for more great ideas. Thank you for the great idea! |
Paint a tree
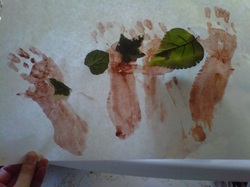
I actually got this one from a Gymboree art class. Easy way for kids to paint a tree for your wall.
Simply paint the bottom of their foot with brown paint, then stick leaves (either the plastic kind from a craft or dollar store, or ones you gather in the yard) into the wet paint, and let it dry.
Simply paint the bottom of their foot with brown paint, then stick leaves (either the plastic kind from a craft or dollar store, or ones you gather in the yard) into the wet paint, and let it dry.
SPRINGS
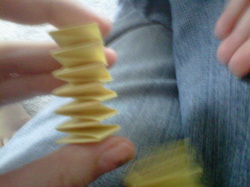
Ok, everyone feel free to make fun of this, but I was a little impressed such young children can do it, and it's still fun. I'm not sure where I learned them, but I've been making them for years. Honestly, it entertained my child for an afternoon.
You need: 2 strips of construction paper and glue
Hold the strips of paper to form an "L"
Cross the bottom piece over the top piece, ie fold the vertical piece down and across the horizontal piece, then fold the horizontal piece across the vertical one.
Continue until you reach the end of your paper.
Glue ends closed.
If you squish it and release it it will in fact "spring" just a little
These are great for Santa's arms and legs, put faces on the flat end and make a caterpillar, or put a construction paper flower on the top and you get a swaying flower.
Use your imagination too see everything they can do!
PomPoms
I found the instructions for these online, and will add the link. The basic idea is to use cardboard cutouts to wrap the yarn around then cut the ends and fluff it out! I'll admit my first attempt didn't work so well, but with some practice I think they'll look great!! http://www.helloknitty.com/pdfs/pompom.pdf This was a great set of instructions, and I suggest this website for future ideas :)
I found the instructions for these online, and will add the link. The basic idea is to use cardboard cutouts to wrap the yarn around then cut the ends and fluff it out! I'll admit my first attempt didn't work so well, but with some practice I think they'll look great!! http://www.helloknitty.com/pdfs/pompom.pdf This was a great set of instructions, and I suggest this website for future ideas :)
